Modern motorcycles like the 2014 Aprilia Dorsoduro 750 are complex machines equipped with an Engine Control Unit (ECU) that monitors various systems. When something goes wrong, the ECU often logs fault codes, which can be invaluable for diagnosing issues. Instead of relying solely on a dealership, you can access this diagnostic information yourself using an OBD2 connector and the right software. This guide will walk you through the process of reading fault codes from your Dorsoduro 750, empowering you to understand your bike’s health and potentially save on repair costs.
To get started with DIY diagnostics on your Aprilia Dorsoduro 750, you’ll need a few key components. Thankfully, these are readily available and relatively inexpensive, putting the power of engine diagnostics right in your hands.
Here’s what you will need to read the fault codes from your Aprilia Dorsoduro 750:
- OBD2 Adapter with FTDI Chip: This is the interface between your motorcycle’s diagnostic port and your computer. It’s crucial to choose one with an FTDI chip for compatibility with the diagnostic software we’ll be using. These adapters are widely available online.
- Fiat 3-Pin Adapter: Aprilia motorcycles, like many European brands, often use a different diagnostic port than the standard OBD2 16-pin connector found in cars. The Fiat 3-pin adapter bridges this gap, connecting to your bike’s diagnostic port and adapting it to the OBD2 interface. You’ll need this adapter to physically connect the OBD2 adapter to your Dorsoduro 750.
- Battery Connector Wires (Positive and Ground): Some Fiat 3-pin adapters come with separate positive and ground wires that need to be connected directly to your motorcycle’s battery. This ensures a stable power supply for the OBD2 adapter during diagnostics. While some adapters might work with just a positive connection, using both positive and ground is generally recommended for a reliable connection.
- Laptop with Windows OS: The diagnostic software we’ll be using, GuzziDiag, is primarily designed for Windows. While there are versions for other operating systems, Windows generally offers the most straightforward compatibility.
- GuzziDiag Software: This free software is the heart of the diagnostic process. Developed by enthusiasts, GuzziDiag allows you to communicate with your Aprilia ECU, read fault codes, and even perform other functions like resetting service lights (use with caution). You can download it from http://www.von-der-salierburg.de/download/GuzziDiag/.
Once you have gathered all the necessary equipment, follow these steps to connect to your Dorsoduro 750 and read any stored fault codes:
-
Install OBD2 Adapter Drivers: Begin by installing the necessary drivers for your OBD2 adapter on your laptop. These drivers allow your computer to communicate with the adapter. Typically, the drivers are provided by the adapter manufacturer and can often be found on a mini-CD included with the adapter or downloaded from their website. After installation, check the COM port settings in your Device Manager to note which COM port has been assigned to your OBD2 adapter. GuzziDiag will need this information.
-
Download and Install GuzziDiag: Download the GuzziDiag application from the provided link, ensuring you get the Windows version for optimal compatibility. Installation is usually straightforward, involving extracting the downloaded files to a folder on your computer.
-
Locate the Diagnostic Connector on Your Dorsoduro 750: The diagnostic connector on the Dorsoduro 750 is typically located under the seat, on the left-hand side of the bike. You may need to remove the rider seat to access it. It’s usually a capped, 3-pin connector.
-
Connect the Fiat 3-Pin Adapter: Attach the Fiat 3-pin adapter to the diagnostic connector on your motorcycle. Ensure it’s securely connected.
-
Connect Power Wires to the Battery: Connect the positive and ground wires from the Fiat 3-pin adapter to the positive and negative terminals of your motorcycle’s battery, respectively. Make sure these connections are secure to provide consistent power.
-
Connect OBD2 Adapter: Plug the OBD2 adapter into the Fiat 3-pin adapter. You should see the LED indicator on the OBD2 adapter light up, indicating it’s receiving power.
-
Connect to Computer: Connect the OBD2 adapter to your laptop via a USB cable. Use the COM port you identified earlier during driver installation (e.g., COM1).
-
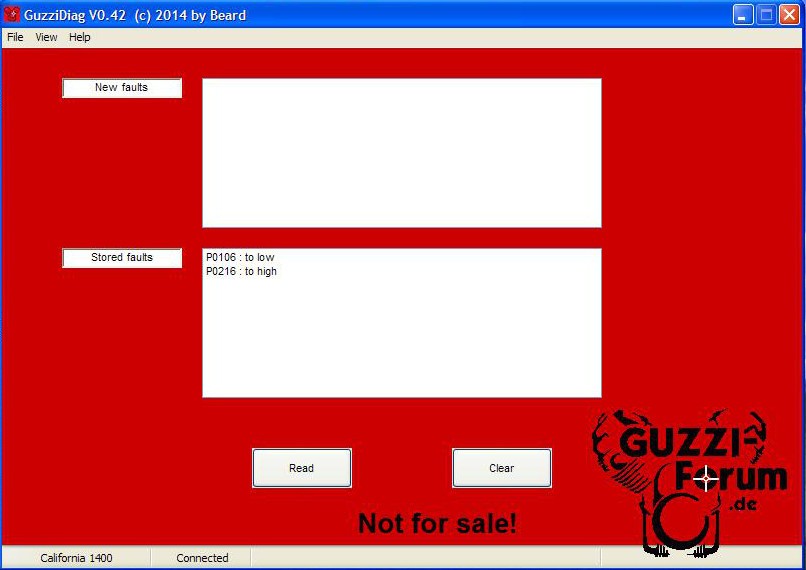
Launch GuzziDiag and Configure: Start the GuzziDiag application on your laptop. In the software, select the correct COM port that your OBD2 adapter is using. For the “Bike Model” selection, choose “California 1400”. While it might seem counterintuitive, this setting is known to work for the Dorsoduro 750 ECU communication.
-
Turn On the Ignition: Turn the ignition key to the “ON” position on your Dorsoduro 750. Do not start the engine.
-
Connect to ECU in GuzziDiag: In the GuzziDiag software, go to “File” in the menu and click “Connect”. The software should now attempt to establish a connection with your motorcycle’s ECU. If successful, you should see a confirmation message or indication within GuzziDiag.
-
Read Fault Codes: Once connected, navigate to “View” in the menu and select “Faults”. Then, click the “Read” button. GuzziDiag will now retrieve and display any fault codes stored in your ECU.
After reading the fault codes, GuzziDiag will display them numerically. These codes are standardized codes, but for specific interpretations related to your Aprilia Dorsoduro 750, you will need to consult the official Aprilia service manual.
Understanding and Interpreting Fault Codes
The fault codes you retrieve are your starting point for diagnosing issues. To understand what these codes mean for your Dorsoduro 750, you’ll need to refer to the service manual specific to your motorcycle model. The original author helpfully linked to service manuals for the Dorsoduro 750 ABS and Factory models. While a direct manual for the non-ABS Dorsoduro 750 was not linked, the Factory manual can still be a valuable resource, particularly the electrical system section.
Within the service manual, usually in the “Electrical System” chapter, you’ll find a listing of fault codes and their descriptions. For example, the author’s fault codes pointed to issues with the rear MAP sensor. By consulting the manual, specifically around page ELE SYS-143 and onwards in the Factory manual, they could pinpoint the potential problem.
Caution and Disclaimer
While using GuzziDiag and an OBD2 connector is a powerful tool, it’s essential to proceed with caution. As the original author and GuzziDiag developers emphasize, using this software is at your own risk. Incorrect use or modifications to your ECU can potentially cause damage. It is crucial to:
- Only use software and adapters from reputable sources.
- Follow instructions carefully and double-check connections.
- Understand that you are working with your motorcycle’s sensitive electronic systems.
- If you are unsure about any step, consult a qualified motorcycle technician.
Conclusion
Reading fault codes on your 2014 Aprilia Dorsoduro 750 using an OBD2 connector and GuzziDiag software is a valuable skill for any owner. It allows you to gain insights into your bike’s health, potentially diagnose problems early, and make informed decisions about maintenance and repairs. By following this guide and proceeding with caution, you can empower yourself with DIY diagnostic capabilities and take better care of your motorcycle. Remember to always consult your service manual for accurate fault code interpretations and professional help when needed.