Locating the fuse boxes in your 2013 Hyundai Elantra is a crucial first step in diagnosing and resolving electrical problems. Fuses protect your vehicle’s electrical system from overloads, and when one blows, it can cause a variety of issues, potentially even affecting your car’s On-Board Diagnostics II (OBD2) port. Understanding the fuse layout is essential for every car owner, whether you’re a seasoned DIYer or just starting to learn about car maintenance. This guide will walk you through the fuse locations in your 2013 Hyundai Elantra, providing detailed information to help you identify and address fuse-related problems efficiently.
Understanding Fuse Box Locations in Your 2013 Hyundai Elantra
For the 2013 Hyundai Elantra model, you’ll find the primary fuse boxes in two key locations: inside the passenger compartment and in the engine bay. Knowing where to find each of these is vital for quick troubleshooting.
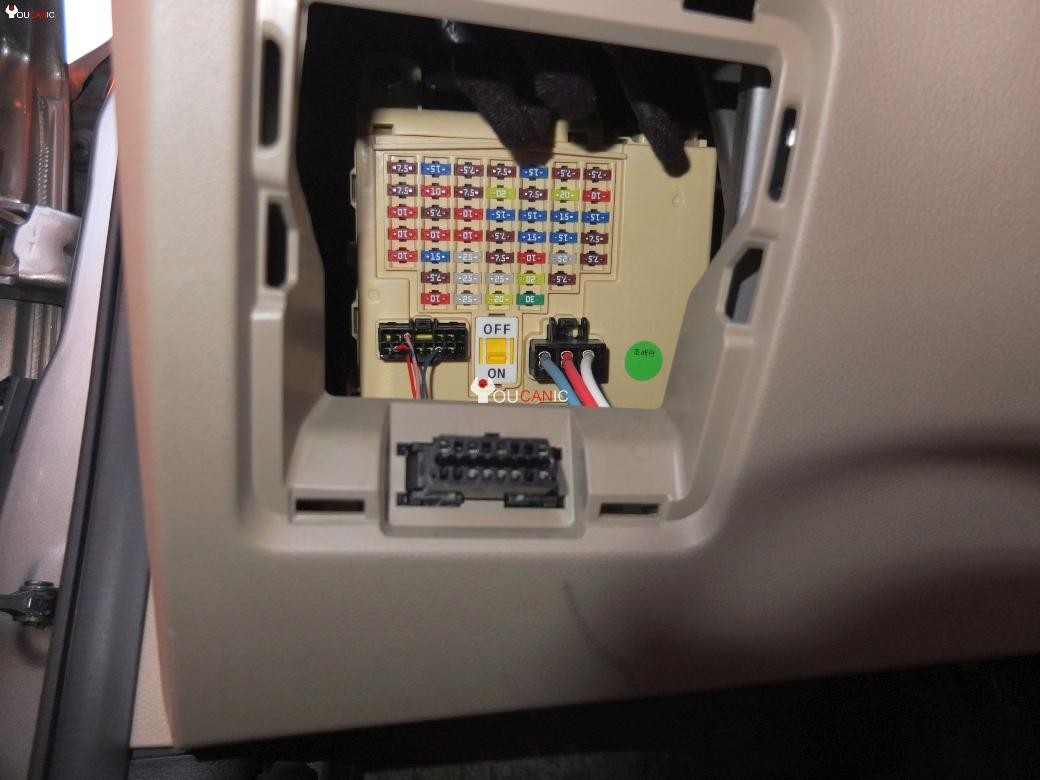
Interior Fuse Box Location (Under the Dashboard)
The first fuse box is conveniently located inside your Elantra, beneath the dashboard on the driver’s side. This placement makes it easily accessible for checking fuses related to interior components and systems.
To access this fuse box:
- Locate the Panel: Look for a rectangular panel on the lower part of the dashboard, usually on the left side of the steering wheel.
- Open the Cover: You may need to use a small screwdriver or your fingers to gently pry open the fuse box cover. It usually clips or snaps into place.
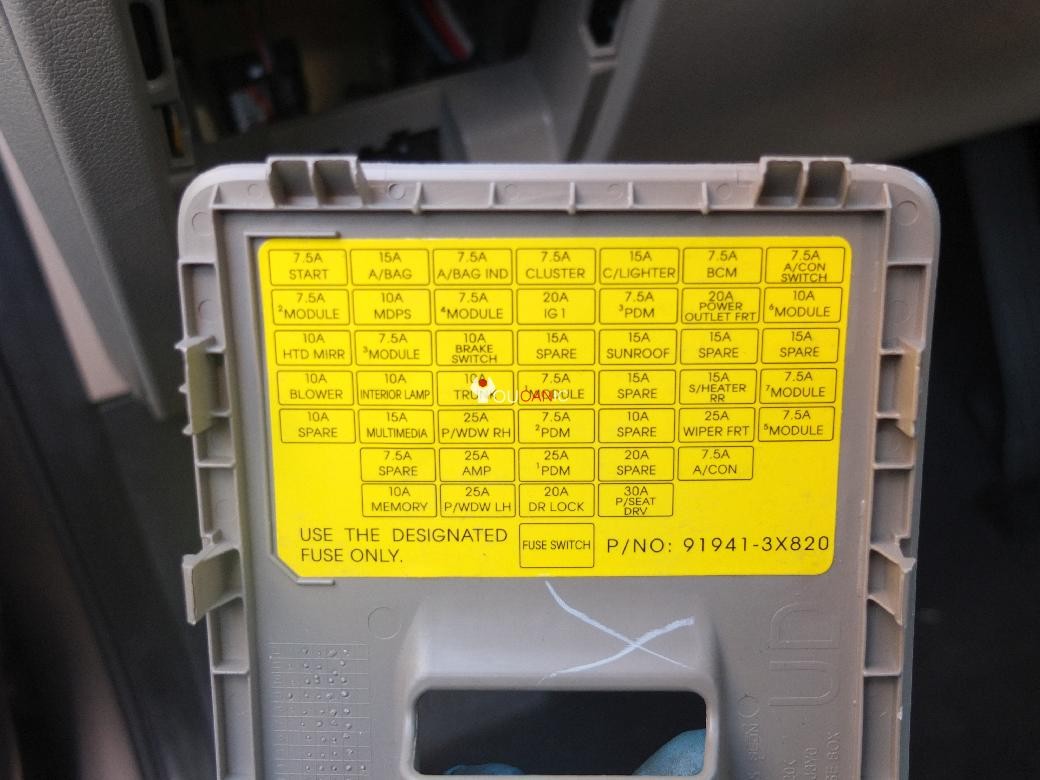
Once open, you’ll see a layout diagram on the inside of the cover or directly on the fuse box itself. This diagram is crucial for identifying the specific fuse you need to check.
Here’s a detailed fuse listing for the interior instrument panel fuse box of your 2013 Hyundai Elantra:
| Fuse Name | Fuse rating | Protected Component |
|---|---|---|
| START | 7.5A | W/O Smart Key: ICM Relay Box(Burglar Alarm Relay), With Smart Key: A/T – Transaxle Range Switch, M/T – ECM, E/R Fuse & Relay Box(Start 1 Relay), Smart Key Control Module |
| A/BAG | 15A | SRS Control Module, Passenger Weight Classification Sensor |
| A/BAG IND | 7.5A | Instrument Cluster |
| CLUSTER | 7.5A | ISG LDC (Audio), Cluster (ISG) |
| C/LIGHTER | 15A | Cigarette Lighter |
| BCM | 7.5A | Smart Key Control Module, BCM |
| A/CON SWITCH | 7.5A | A/C Control Module |
| MODULE 2 | 7.5A | Electro Chromic Mirror, ESC Off Switch |
| MDPS | 10A | EPS Control Module |
| MODULE 4 | 7.5A | Rear Parking Assist Sensor LH/RH (IN/OUT), A/C Control Module(Auto A/C), ATM Lever Indicator |
| IG1 | 20A | E/R Fuse & Relay Box(Fuse – TCU 1, B/UP LP, ECU 3, ABS 3) |
| PDM 3 | 7.5A | Smart Key Control Module |
| POWER OUTLET FRT | 20A | Power Outlet |
| MODULE 6 | 10A | AMP, Power Outside Mirror Switch, Audio, A/V & Navigation Head Unit, Digital Clock |
| HTD MIRR | 10A | Driver/Passenger Power Outside Mirror, A/C Control Module |
| MODULE 3 | 7.5A | Audio, Tire Pressure Monitoring Module, Digital Clock, BCM, Instrument Cluster, Driver/Passenger Seat Warmer Module |
| BRAKE SWITCH | 10A | – |
| SPARE | 15A | – |
| SUNROOF | 15A | Sunroof |
| SPARE | 15A | – |
| SPARE | 15A | – |
| BLOWER | 10A | Manual A/C – A/C Control Module, ECM/PCM, Blower Resistor |
| INTERIOR LAMP | 10A | Luggage Lamp, Vanity Lamp LH/RH, Room Lamp, Overhead Console Lamp, Ignition Key Ill. & Door Warning Switch(W/O Smart Key) |
| TRUNK | 10A | Trunk Relay |
| MODULE 1 | 7.5A | Sport Mode Switch(A/T), Key Solenoid(W/O Smart Key) |
| SPARE | 15A | – |
| S/HEATER RR | 15A | Rear Seat Warmer Switch LH/RH |
| MODULE 7 | 7.5A | Smart Key Control Module, BCM |
| MULTIMEDIA | 15A | Audio, A/V & Navigation Head Unit |
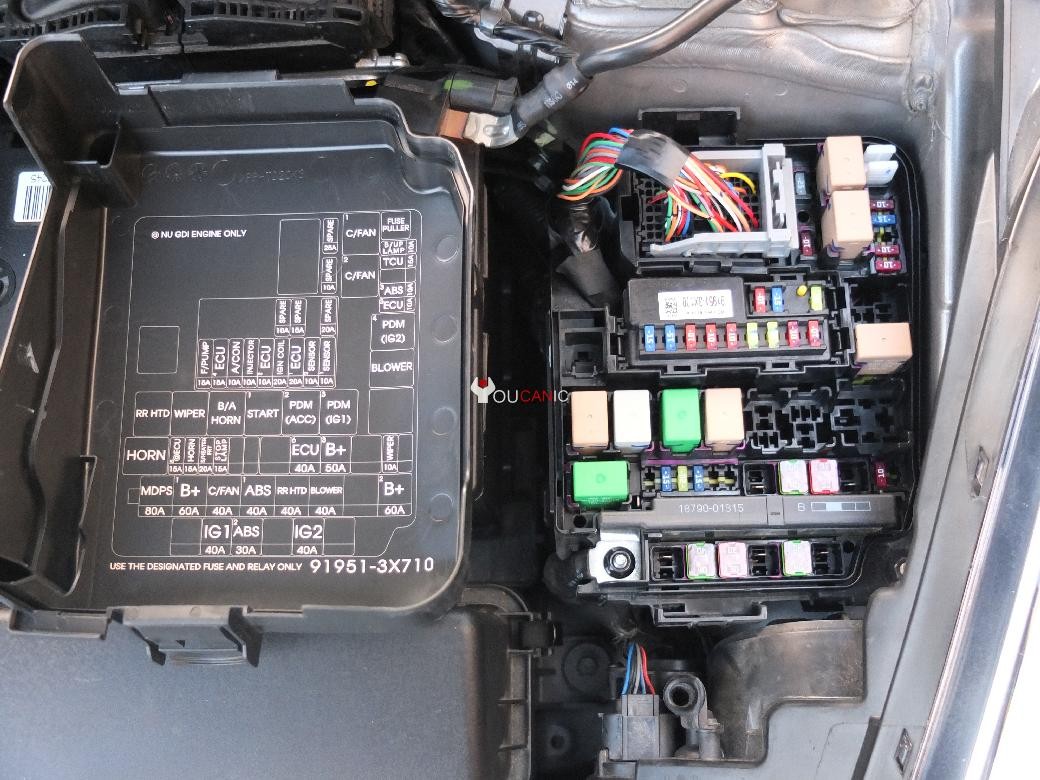
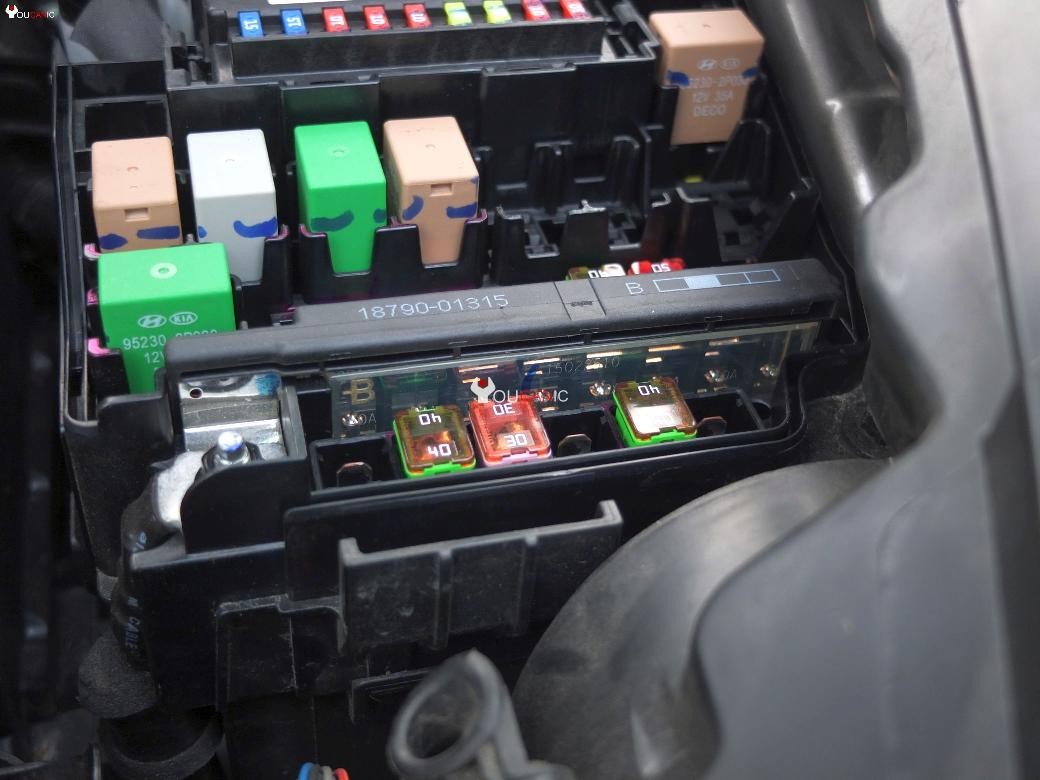
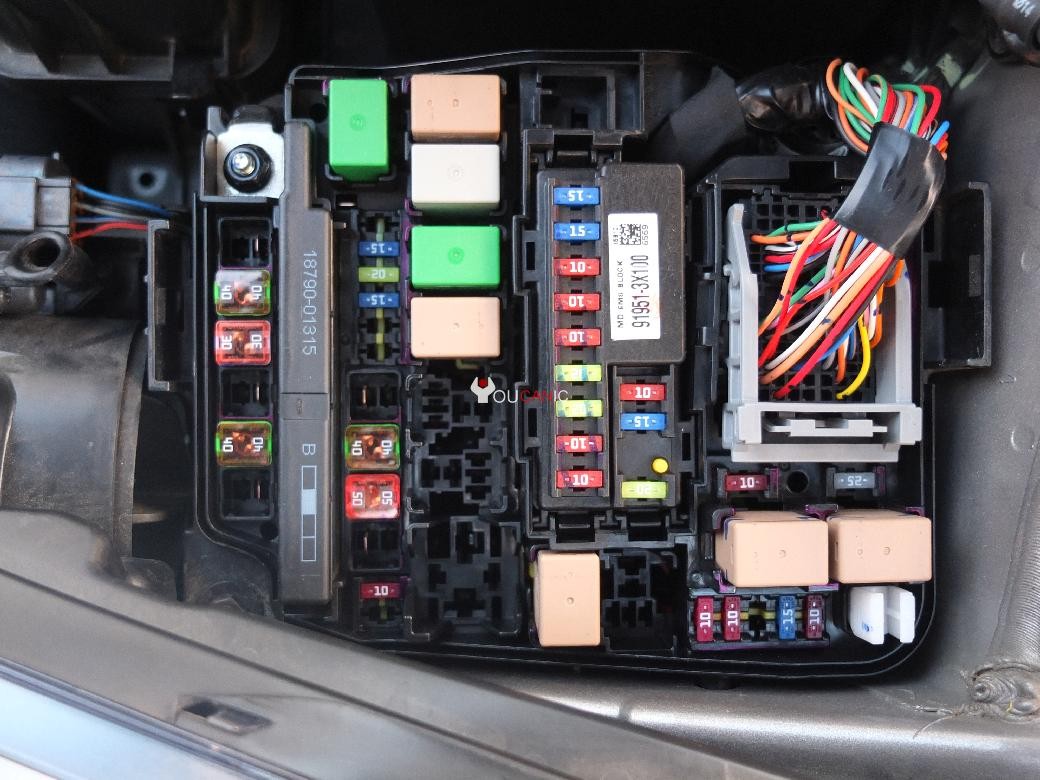
Engine Compartment Fuse Box Location
The second fuse box is situated in the engine compartment, typically closer to the battery and other engine components. This box houses fuses that protect circuits related to the engine, powertrain, and other critical vehicle systems.
To locate the engine bay fuse box:
- Open the Hood: Ensure your vehicle is safely parked and open the hood.
- Locate the Box: Look for a black plastic box, usually rectangular or square, often labeled with fuse symbols. It is commonly placed near the battery or along the fender wall.
- Open the Cover: Similar to the interior fuse box, the engine bay fuse box cover is usually secured with clips. Gently unclip or unfasten it to access the fuses.
Again, you will find a fuse diagram either on the inside of the cover or on the fuse box itself. Refer to this diagram to identify the correct fuse.
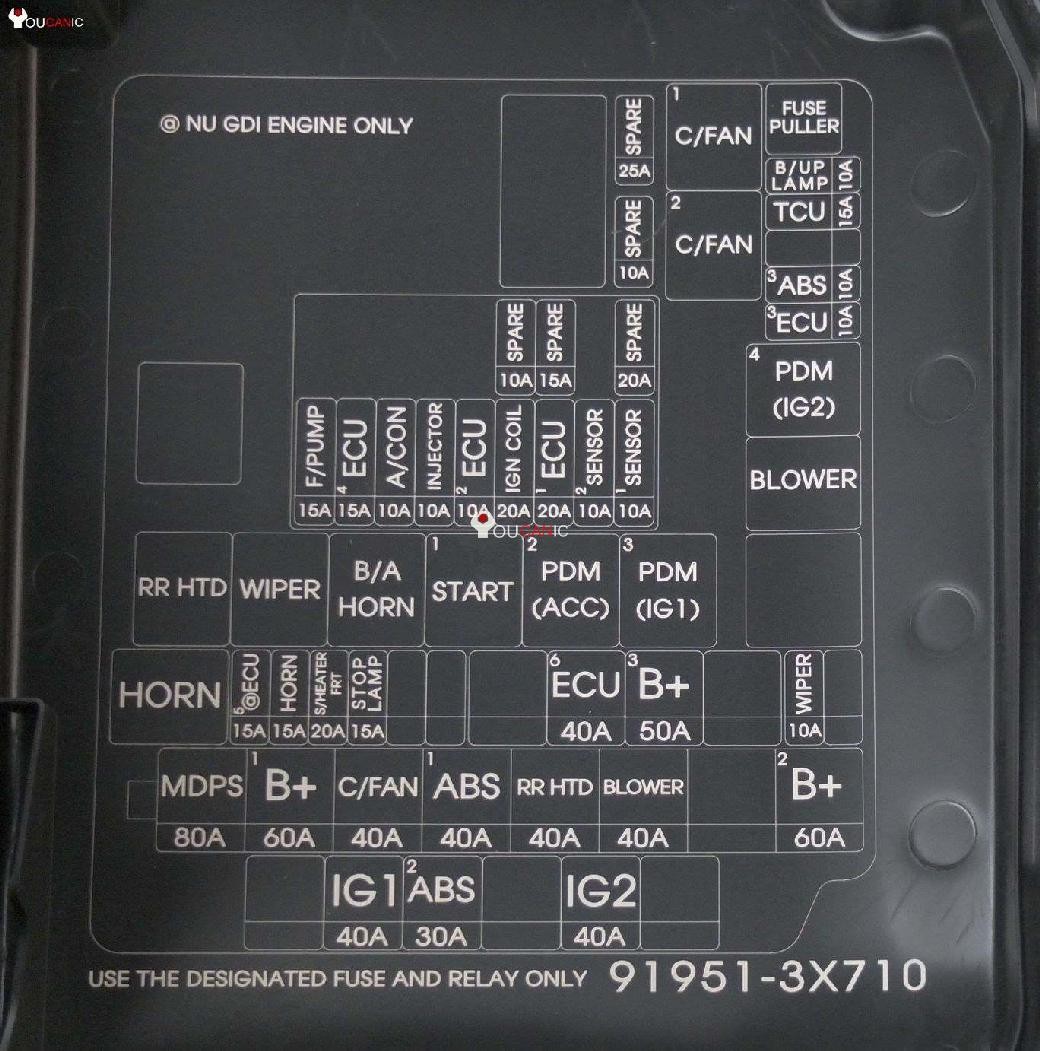
Here is the fuse listing for the engine compartment fuse panel in your 2013 Hyundai Elantra:
| MDPS | 80A | EPS Control Module | |
|---|---|---|---|
| B+1 | 60A | SmartJunction Box(ARISU 1 (4CH), IPS 1, FUSE – P/WDW LH, P/WDW RH, TRUNK, AMP 1) | |
| C/FAN | 40A | C/FAN Lo Relay, C/FAN Hi Relay | |
| ABS 1 | 40A | ESC Module, Multipurpose Check Connector | |
| RR HTD | 40A | RR HTD Relay | |
| BLOWER | 40A | Blower Relay | |
| SPARE | 40A | – | |
| B+2 | 60A | Smart Junction Box(Turn Signal Lamp Sound Relay, ARISU 2 (4CH), IPS (1CH), | |
| IPS (2CH), FUSE – P/SEAT DRV, SUNROOF) | |||
| B/UP LAMP | 10A | Electro Chromic Mirror, A/V & Navigation Head Unit, Rear Combination Lamp (In) LH/RH, M/T – | |
| Back-Up Lamp Switch, BCM, Instrument Cluster | |||
| TCU 1 | 15A | M/T – Vehicle Speed Sensor, A/T – Transaxle Range Switch | |
| ABS 3 | 10A | ESC Module, Multipurpose Check Connector | |
| ECU 3 | 10A | Stop Lamp Switch, M/T – ECM, A/T – PCM | |
| WIPER | 10A | Rain Sensor, M/T – ECM, A/T – PCM | |
| B+3 | 50A | Smart Junction Box (Leak Current Autocut Device, FUSE – MODULE 1, PDM 1, PDM 2, DR LOCK) | |
| EMS | 40A | EMS Box(Engine Control Relay, FUSE – ECU 4, A/CON, F/PUMP) | |
| ISG INVERTER | 50A | Oil Pump Inverter | |
| STOP LP | 15A | Stop Lamp Switch, Smart Key Control Module | |
| S/HEATER FRT | 20A | Driver/Passenger Seat Warmer Module | |
| HORN | 15A | Horn Relay | |
| IG 2 | 40A | W/O Smart Key: Ignition Switch, Start 1 Relay, | |
| With Smart Key: PDM 4 (IG2) Relay, Start 1 Relay | |||
| ABS 2 | 30A | ESC Module, Multipurpose Check Connector | |
| IG 1 | 40A | W/O Smart Key: Ignition Switch, With Smart Key: PDM 3 (IG1) Relay, PDM 2 (ACC) Relay | |
| F/PUMP | 15A | F/PUMP Relay | |
| ECU 4 | 15A | PCM (A/T), ECM (M/T) | |
| A/CON | 10A | A/C COMP Relay | |
| INJECTOR | 10A | Injector #1 / #2 / #3 / #4, A/C COMP Relay, F/PUMP Relay | |
| ECU 2 | 10A | PCM (A/T), ECM (M/T) | |
| IGN COIL 1 | 20A | Ignition Coil #1 / #2 / #3 / #4, Condenser | |
| ECU 1 | 20A | – | |
| SENSOR 2 | 10A | Immobilizer Module, Camshaft Position Sensor #1 / #2 | |
| SENSOR 1 | 10A | Oxygen Sensor (UP/DOWN), Canister Close Valve, Variable Intake Solenoid Valve, Oil Control Valve #1 / #2, Purge Control Solenoid Valve, C/FAN LO Relay, C/FAN HI Relay |
OBD2 Port and Fuse Considerations
While there isn’t a specific fuse labeled “OBD2 port,” the OBD2 system relies on power and communication circuits that are protected by fuses. If your OBD2 port isn’t working, it’s unlikely to be a direct fuse for the port itself, but rather a fuse related to the systems it connects to, such as the Engine Control Module (ECM) or Body Control Module (BCM).
Possible Fuse Connections to OBD2 Issues:
- ECU Fuses: Fuses labeled “ECU” (Engine Control Unit) or “ECM” (Engine Control Module) are critical. The ECM is the brain of your engine management system and is essential for OBD2 functionality. Check fuses like “ECU 3,” “ECU 4,” “ECU 2,” and “ECU 1” in the engine compartment fuse box. A blown fuse here could disable the ECM and, consequently, the OBD2 port.
- BCM Fuse: The Body Control Module manages various body electronics, and it can also be involved in OBD2 communication. Check the “BCM” fuse in the interior fuse box.
- Power Fuses: Fuses that supply power to various modules, such as “IG1” or “IG2,” might also indirectly affect the OBD2 port if they power the systems necessary for its operation.
If you are experiencing issues with your OBD2 port, and your scan tool is not powering up or connecting, check these related fuses in both fuse box locations using the diagrams provided. Always refer to your Elantra’s owner’s manual for the most accurate fuse information and locations, as diagrams can sometimes vary slightly.
How to Check for a Blown Fuse
Identifying a blown fuse is a straightforward process:
- Visual Inspection: Remove the fuse from the fuse box. Hold it up to the light and look at the thin wire inside the fuse.
- Check for a Gap or Darkening: If the wire is broken or melted, creating a gap, or if the fuse casing is darkened or burnt, the fuse is blown and needs replacement.
Fuse Replacement and Cost
Replacing a blown fuse is typically an inexpensive and simple DIY task.
- Cost of Fuses: Mini blade fuses for your Hyundai Elantra are readily available at auto parts stores and are quite affordable, usually costing between $10 to $20 for a multi-pack of assorted fuses.
- Dealer Replacement Cost: If you opt to have a dealership replace a fuse, labor costs can significantly increase the price, potentially reaching around $100 or more. This is primarily due to labor charges and diagnostic time, even for a simple fuse replacement.
Important Note: Always replace a blown fuse with one of the same rating (amperage). Using a fuse with a higher rating can overload the circuit and potentially cause further damage or even a fire hazard. Refer to your fuse box diagram to ensure you are using the correct replacement fuse.
Understanding the fuse locations and diagrams for your 2013 Hyundai Elantra empowers you to perform basic electrical system troubleshooting. By following this guide, you can confidently locate fuse boxes, identify fuses, and replace blown ones, potentially saving time and money on simple repairs. Remember to always consult your vehicle’s owner’s manual for the most accurate and specific information related to your Hyundai Elantra model. For more complex electrical issues, it’s always best to consult a certified mechanic.