Experiencing issues with your 2012 Hyundai Elantra’s transmission? A common culprit, especially if you’re seeing error codes or erratic gear shifting, could be the Transmission Range Sensor (TRS), also known as the Automatic Transmission Inhibitor Switch or Neutral Safety Switch. This guide will walk you through replacing this sensor yourself, potentially saving you time and money compared to a mechanic visit. While understanding the 2012 Hyundai Elantra Oem Factory Obd2 Wiring Diagram can be beneficial for advanced diagnostics, this guide focuses on a straightforward mechanical replacement to address common TRS issues.
The Transmission Range Sensor plays a crucial role in your Hyundai Elantra’s transmission system. It accurately detects the gear position you select and relays this information to the car’s computer. This data is essential for several functions, including displaying the correct gear on your dashboard, ensuring your car starts only in Park or Neutral, and enabling smooth automatic gear shifting. When the TRS malfunctions, it can lead to a range of problems, from dashboard indicator errors to actual transmission performance issues.
Common symptoms of a failing TRS include:
- Check Engine Light (CEL) with error code P0705: This is a primary indicator of a TRS problem, detectable with an OBD2 scanner.
- Gear indicator on the dashboard is blank or erratic: The display might not show the correct gear, or it might flicker or disappear.
- Transmission not shifting properly: You might experience rough shifting, delayed shifts, or the transmission not downshifting to first gear when stopping.
- Difficulty starting the car: If the sensor incorrectly signals that the car is not in Park or Neutral, the engine might not start.
Fortunately, replacing the TRS on a 2012 Hyundai Elantra is a relatively simple DIY task for car owners with basic mechanical skills. The sensor is typically located in an accessible area of the engine bay, making the replacement process quite manageable.
Tools and Parts You’ll Need:
- New Transmission Range Sensor (Part number 4270026700 is a commonly updated and robust version)
- Ratcheting socket wrench or driver
- 10mm socket
- 12mm socket
- 14mm socket
- Small flat-head screwdriver
- OBD2 code reader (to verify repair and clear codes)
- Wheel chocks
Safety First – Before You Begin!
It is absolutely critical to prioritize safety when working on your vehicle.
SAFETY WARNING
Engage the parking brake firmly and use wheel chocks to secure the rear wheels. The TRS is connected to the transmission gear shift linkage. Accidental movement of this linkage during the replacement process could cause the car to roll if it is not properly secured. This is a serious safety hazard, so double-check that your vehicle is stable before proceeding.
Step-by-Step Guide to Replacing the TRS on Your 2012 Hyundai Elantra:
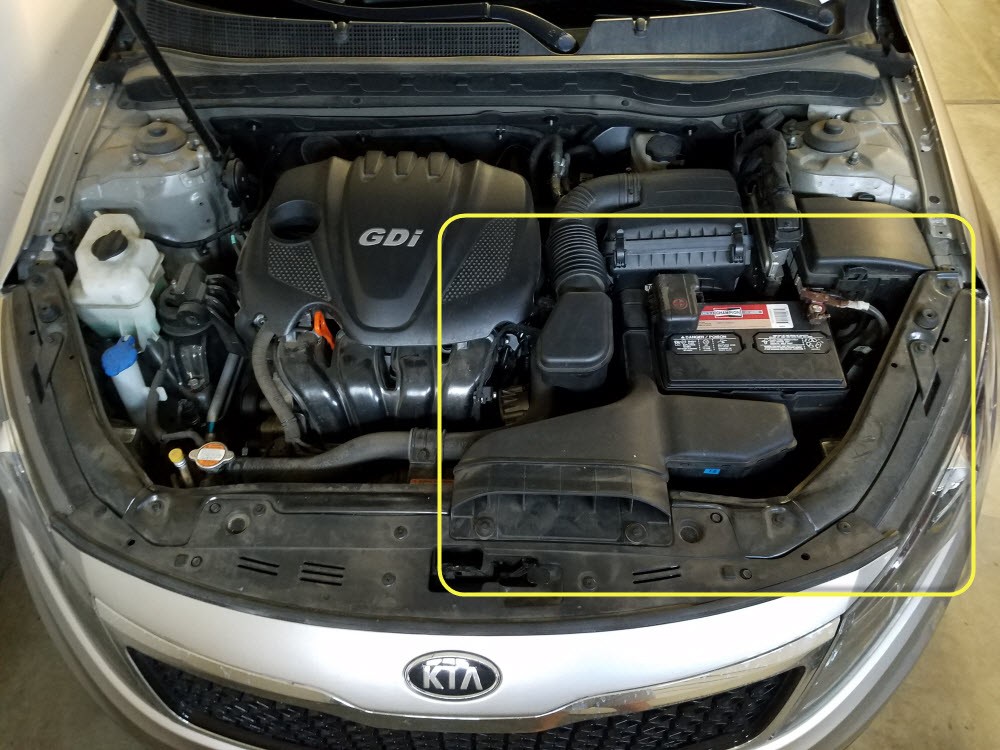
- Remove the Air Intake: Locate the air intake assembly. Typically, it’s positioned at the front driver-side of the engine bay. Use a 10mm socket to unscrew the two bolts securing it. Once the bolts are removed, lift the air intake unit slightly and pull it straight towards you to disengage it.
- Disconnect the Battery: Open the hood and locate the battery terminals. Using a 10mm socket, disconnect the negative terminal first. Then, disconnect the positive terminal. It’s a good practice to cover the terminals with a cloth or insulator to prevent accidental contact or short circuits while you are working.
- Remove the Battery: Identify the battery retainer, usually located at the front of the battery base. Use a 12mm socket to remove the bolt securing the retainer. Once the bolt is removed, carefully lift the battery out of the battery tray.
- Remove the Battery Tray: The battery tray is typically held in place by several bolts. Locate and remove the four 12mm bolts within the tray and the two 10mm bolts at the top of the tray. After removing all the bolts, you can usually maneuver the battery tray out of the way towards the front of the engine bay, providing access to the TRS.
- Remove the Old Transmission Range Sensor (TRS): Now you should clearly see the TRS. It’s held in place by one 14mm nut in the center and two 10mm bolts on the sides. Using the appropriate sockets, remove the 14mm nut and the two 10mm bolts. Important: Do not touch the nut located on the right side of the arm connected to the TRS. Only remove the nut and bolts that are directly attached to the TRS itself. After removing these fasteners, carefully lift off the metal arm and then remove the old TRS. Finally, disconnect the electrical connector from the TRS. You may need to use a small flat-head screwdriver to gently release the locking clip on the connector.
-
Install the New Transmission Range Sensor: Connect the electrical connector to the new TRS. Position the new TRS in its location. If it doesn’t slide on easily, slightly wiggle it or rotate the center hole to align it with the bolt. Similarly, if the metal arm doesn’t readily slide back onto the center bolt, you might have inadvertently moved the gear selection bolt. Use a vice grip or wrench to gently rotate the gear selection bolt back to the correct position until the arm slides on smoothly. Once the TRS and arm are correctly positioned, reinstall the two 10mm bolts and the 14mm nut, tightening them securely.
-
Re-install the Battery Tray: Place the battery tray back into its original position and secure it with the six bolts (four 12mm and two 10mm) you removed earlier.
-
Re-install the Battery: Carefully place the battery back into the tray. Reinstall the battery retainer and tighten the 12mm bolt. Reconnect the battery terminals, starting with the positive terminal first, then the negative terminal. Ensure they are securely tightened.
-
Re-install the Air Intake: Slide the air intake assembly back into its position and secure it with the two 10mm bolts.
-
Test Drive: Once everything is reassembled, take your 2012 Hyundai Elantra for a test drive in a safe area. Check that all gears engage smoothly and that the gear indicator on the dashboard is displaying correctly.
-
Reset OBD “Permanent DTC” (if necessary): Even if the Check Engine Light has turned off, a “Permanent Diagnostic Trouble Code” (PDTC) related to the TRS might still be stored in the car’s computer. This PDTC could cause you to fail an emissions test. To clear it, perform the “Universal Trip Drive Pattern”:
- Start the car and let it idle for at least 30 seconds.
- Drive the car for at least 5 minutes at normal driving speeds (total drive time should be 10 minutes or more).
- Let the car idle again for at least 30 seconds.
- Turn the car off.
- Use your OBD2 code reader to verify that the “Permanent DTC” has been cleared.
Verifying the Repair and Further Resources:
After completing these steps, your 2012 Hyundai Elantra should be running smoothly without the TRS-related issues. Use your OBD2 scanner to confirm that the P0705 code is cleared and to check for any other potential codes.
For further information and resources, you can refer to:
- OBD Code P0705 Information: https://www.obd-codes.com/p0705
- Recommended Replacement Part: KIA TRS/AT Inhibitor 4270026700: https://www.kiapartsnow.com/genuine/kia-switch-inhibitor~4270026700.html (Note: While listed as Kia part, this is often compatible with Hyundai vehicles)
- Optional Replacement Parts (Nuts, Bolts, Washers): Links to optional replacement hardware were provided in the original article.
- Technical Service Bulletin (TSB): https://f01.justanswer.com/mbrauto/0db6607f-35cd-4cda-ad06-8296853b1864_2015_Kia_Sorento.pdf (While for Kia Sorento, TSBs can offer general insights into similar issues).
- Video Guide (Hyundai Elantra TRS Replacement): Search online video platforms for “Hyundai Elantra Transmission Range Sensor Replacement” for visual guidance.
- Image Gallery (Kia Sorrento Example): https://imgur.com/gallery/6DEAaqd (Provides visual reference for a similar repair on a Kia vehicle).
- Forum Discussions: Explore Hyundai Elantra and Kia forums for discussions related to P0705 and TRS replacement for additional community knowledge.
By following this guide and utilizing the provided resources, you can confidently tackle the Transmission Range Sensor replacement on your 2012 Hyundai Elantra and get back on the road with a smoothly functioning transmission.