Experiencing issues with your OBD2 port in your 2008 Nissan Altima? A common culprit, often overlooked, is a blown fuse. While the original post explored voltage checks and connection problems, let’s expand on that and specifically address the “2008 Nissan Altima Obd2 Fuse”. This guide will help you locate the relevant fuse, diagnose potential issues, and troubleshoot problems with your OBD2 port.
Understanding the OBD2 Fuse in Your 2008 Nissan Altima
The On-Board Diagnostics II (OBD2) port in your Nissan Altima is crucial for vehicle diagnostics and emissions testing. It receives power from a dedicated fuse, protecting the system from electrical surges. If your OBD2 scanner isn’t powering up or connecting, a blown fuse should be one of the first things you check.
While fuse box diagrams can vary slightly, the OBD2 fuse in a 2008 Nissan Altima is typically located within the interior fuse box. This fuse box is usually found on the driver’s side, often beneath the dashboard or behind a small access panel on the side of the dashboard, accessible when the driver’s side door is open.
To pinpoint the exact fuse location:
- Consult your 2008 Nissan Altima Owner’s Manual: This is the most reliable source. Look for the fuse box diagram, usually in the “Fuses” section of the manual. Search for labels like “OBD,” “DLC” (Data Link Connector – another name for the OBD2 port), “Accessory Power,” or “Cigar Lighter” as these circuits can sometimes be linked.
- Check Fuse Box Cover: The inside of the fuse box cover itself may also have a diagram indicating fuse locations.
- Visually Inspect: Once you locate the interior fuse box, look for a blown fuse. Fuses are transparent, and a blown fuse will have a broken wire inside.
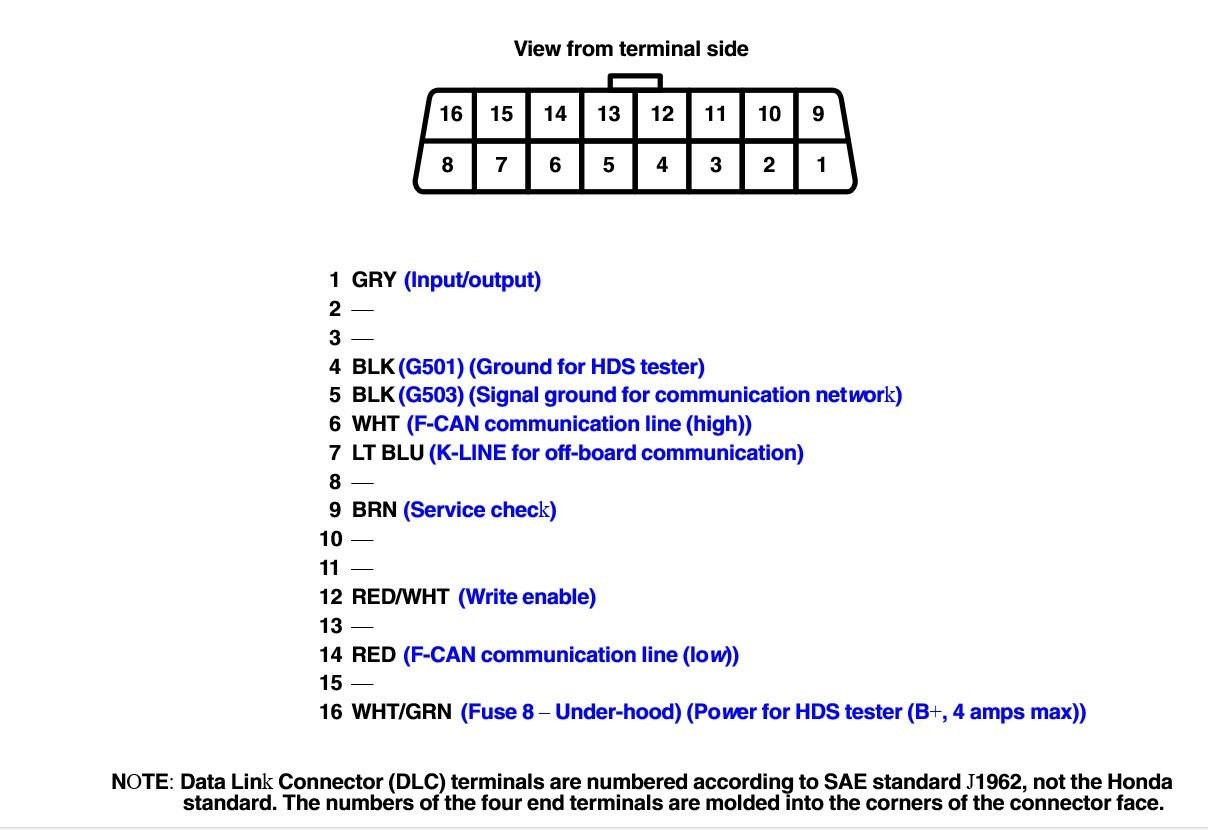 OBD2 port pinout diagram for automotive diagnostics and troubleshooting.
Diagnosing OBD2 Port Issues Beyond the Fuse
If you’ve checked and replaced a blown OBD2 fuse and are still experiencing problems, or if the fuse is intact but your scanner isn’t working, further diagnosis is needed. Let’s revisit some of the voltage checks performed in the original post, ensuring we understand why these tests are important.
Essential OBD2 Port Pin Checks (using a multimeter):
Before starting, ensure your vehicle is turned off. You’ll need a multimeter to perform these checks.
-
Ground Checks (Continuity Test):
- Pin 4 (Chassis Ground) and Vehicle Ground: Set your multimeter to continuity mode (often indicated by a sound symbol). Place one multimeter probe on Pin 4 of the OBD2 port and the other probe on a known good vehicle ground (an unpainted metal part of the car’s chassis – like a bolt or bracket under the dashboard). You should hear a beep or see a low resistance reading, indicating a good ground connection.
- Pin 5 (Signal Ground) and Vehicle Ground: Repeat the continuity test for Pin 5 and vehicle ground. Again, you should have continuity.
- Reasoning: Pins 4 and 5 are ground pins. A poor ground connection can prevent the OBD2 port from functioning correctly. The original post correctly identified good ground connections.
-
Voltage Checks (Voltage Reading):
- Pin 16 (Battery Power) and Vehicle Ground: Switch your multimeter to DC voltage mode (typically 20V setting). Place the red probe on Pin 16 (this pin should provide battery voltage) and the black probe on a vehicle ground. You should read approximately 12V to 14V (depending on battery charge and if the car is running or off). The original post reading of 12.23V is within a normal range for a car that is off.
- Pin 4 & Pin 16: Measure the voltage between Pin 4 (ground) and Pin 16 (power). You should see the same battery voltage reading (around 12V-14V). The 12.26V reading from the original post is expected.
- Pin 5 & Pin 16: Measure the voltage between Pin 5 (ground) and Pin 16 (power). You should also see battery voltage. The 12.26V reading is again, normal.
- Pin 4 & Pin 5: Measure the voltage between Pin 4 and Pin 5 (both ground pins). Ideally, this reading should be very close to 0V. The 0.5mV (0.0005V) reading from the original post is excellent and indicates no significant voltage difference between the ground pins.
- Reasoning: Pin 16 provides power to the OBD2 port. These voltage checks confirm that Pin 16 is receiving power and that the ground pins are functioning as expected.
Interpreting Your Readings:
- No voltage at Pin 16: Double-check your OBD2 fuse. If the fuse is good, there may be a wiring issue between the fuse box and the OBD2 port, which requires further professional diagnosis.
- Good voltage and ground, but scanner still won’t connect: As the original poster experienced, the issue might not be electrical but mechanical. A loose or damaged OBD2 port connector can prevent a reliable connection.
Troubleshooting Connection Issues and Physical Port Problems
The original post highlighted a key issue: a loose physical connection. If your voltage and ground checks are good, but you still struggle to get your OBD2 scanner to connect reliably, consider these points:
- Inspect the OBD2 Port for Damage: Look for bent or pushed-in pins inside the OBD2 port. Carefully straighten any bent pins with a small, non-metallic tool if you are comfortable doing so (exercise extreme caution to avoid short circuits or further damage).
- Check for Obstructions: Ensure nothing is blocking the port, preventing the scanner connector from seating properly.
- Try a Different OBD2 Scanner: Rule out a faulty scanner by trying a different, known-good OBD2 device.
- Clean the OBD2 Port: Gently clean the inside of the port with compressed air or a specialized electronic contact cleaner to remove any dust or debris that might be interfering with the connection.
- Secure Mounting: As the original poster considered, ensuring the OBD2 device is securely mounted can be crucial, especially if the port itself feels loose. In some cases, the entire OBD2 port receptacle might need to be replaced if it is physically damaged or worn out.
Conclusion
Troubleshooting OBD2 port issues in your 2008 Nissan Altima often begins with checking the OBD2 fuse. However, as we’ve explored, a blown fuse is just one potential problem. By systematically checking the power and ground connections, and carefully inspecting the physical port itself, you can effectively diagnose and address many common OBD2 port problems. If you are uncomfortable performing these tests or replacing fuses, always consult a qualified mechanic for professional diagnosis and repair. Remember to always consult your vehicle’s repair manual for the most accurate and model-specific information.