The On-Board Diagnostics II (OBD2) port in your 2007 Acura is a crucial interface for accessing your vehicle’s computer system. Whether you’re checking engine codes, monitoring performance, or ensuring emissions compliance, a functioning OBD2 port is essential. This guide will help you locate and troubleshoot your 2007 Acura’s OBD2 port, ensuring you can connect your diagnostic tools effectively.
Locating the OBD2 Port in Your 2007 Acura
For the 2007 Acura models, including the TL and RDX, the OBD2 port is typically located within the driver’s side interior. You can usually find it beneath the dashboard, in the vicinity of the steering column. It’s often positioned in the lower left area, near the pedals. Look for a 16-pin connector, which is the standard OBD2 port configuration. The port might be exposed or covered by a small plastic flap labeled “OBD II” or “Diagnostic”. A quick visual inspection in this area should reveal the port.
Testing Your 2007 Acura OBD2 Port
If you suspect issues with your OBD2 port, or if your scan tool is not connecting properly, performing a few basic voltage and continuity tests can help diagnose the problem. These tests are similar across many vehicles, including the 2007 Acura. Here’s how you can check the basic functionality using a multimeter:
-
Ground Continuity Check (Pin 4 & 5):
- Set your multimeter to continuity mode.
- Check for continuity between Pin 4 (Chassis Ground) and a known vehicle ground (like a bolt on the car’s frame or the negative battery terminal). You should hear a beep or see a low resistance reading, indicating a solid ground connection. Repeat this test for Pin 5 (Signal Ground). The vehicle ground is often accessible behind the driver’s side kick panel.
-
Voltage Between Ground Pins (Pin 4 & 5):
- Set your multimeter to measure DC voltage.
- Measure the voltage between Pin 4 and Pin 5. This reading should be very low, ideally less than 2V, indicating a proper ground setup. In this case, the reading was around 0.5 mV, which is excellent.
-
Power Check (Pin 16):
- Check the voltage between Pin 16 (Battery Power) and a vehicle ground. Pin 16 should provide battery voltage. For a 12V system, you should expect to see around 12V to 12.6V with the engine off. A reading of 12.23V, as in the original test, is within the expected range for a vehicle with the ignition off.
-
Voltage Between Power and Ground Pins (Pin 4 & 16, Pin 5 & 16):
- Measure the voltage between Pin 4 and Pin 16, and then between Pin 5 and Pin 16. Both readings should be close to the battery voltage, confirming that power and ground circuits are correctly supplying the OBD2 port. Readings of 12.26V in both cases indicate proper voltage supply.
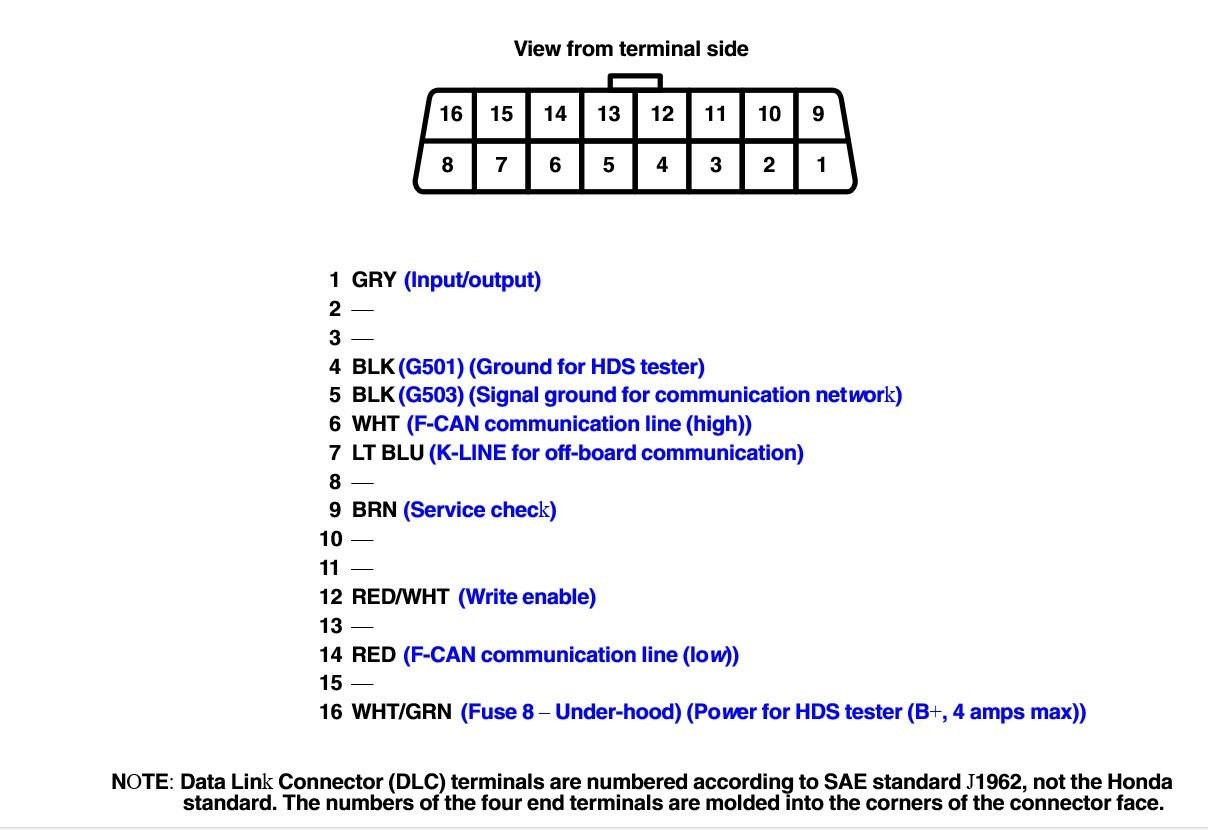 2007 Acura TL OBD2 Port Pinout Diagram: Diagram showing the pin layout of the Diagnostic Link Connector (DLC) or OBD2 port in a 2007 Acura TL, used for automotive diagnostics and scan tools.
Addressing Connection Issues
If your voltage tests are successful, but you still experience inconsistent connections with your OBD2 scan tool, the issue might be a physically loose or damaged port. As noted in the original post, sometimes forcing the connection can temporarily establish communication, suggesting a potential physical issue with the port itself. Compare the connection feel to another vehicle, like a 2007 Acura RDX, to gauge if your port feels looser than it should.
If you suspect a loose OBD2 port, carefully inspect the port for any visible damage or bent pins. If everything appears normal, but the connection remains unreliable, consider seeking professional diagnosis. A mechanic can further assess the port’s integrity and the wiring harness to ensure a stable and reliable connection for your diagnostic needs.
In conclusion, understanding the location and basic testing procedures for your 2007 Acura Obd2 Port is valuable for any car owner. By following these steps, you can effectively troubleshoot connection problems and ensure your diagnostic tools function correctly.